IP Addressing
This guide covers how to configure static IP addresses on OpenWrt routers and create an IP addressing plan for your community network.
This guide implements the concept introduced in Chapter 2 — IP Addressing.
What You'll Learn
- How to change a router's IP address in OpenWrt LuCI
- When to use static IPs vs DHCP
- How to set up a gateway for traffic routing
- How to document your IP plan for troubleshooting
Prerequisites
- At least one router running OpenWrt with LuCI web interface
- Ethernet cable for initial configuration
- Basic understanding of IP addresses (e.g.,
192.168.1.1)
Step-by-Step Implementation
1. Plan your network IP range
Before changing any settings, decide what IP range your network will use.
- If you don't expect more than 255 devices, a
/24network (e.g.,192.168.70.0/24) is sufficient. - Choose a range that doesn't conflict with common defaults. Avoid
192.168.1.xand192.168.0.xsince most routers use these out of the box. - Pick a consistent scheme. For example,
192.168.70.xfor your entire deployment.
Why not use the default?
Most routers ship with 192.168.1.1 as their IP address. If you connect multiple routers without changing their IPs, they'll all claim to be 192.168.1.1 and cause network conflicts.
2. Connect to the router
- Connect your computer to the router using an Ethernet cable.
- Open a web browser and navigate to the router's current IP address (usually
192.168.1.1). - Log in with your OpenWrt credentials.
Tip
Ethernet is recommended for initial configuration. If you configure via Wi-Fi, you may lose connection when the IP changes.
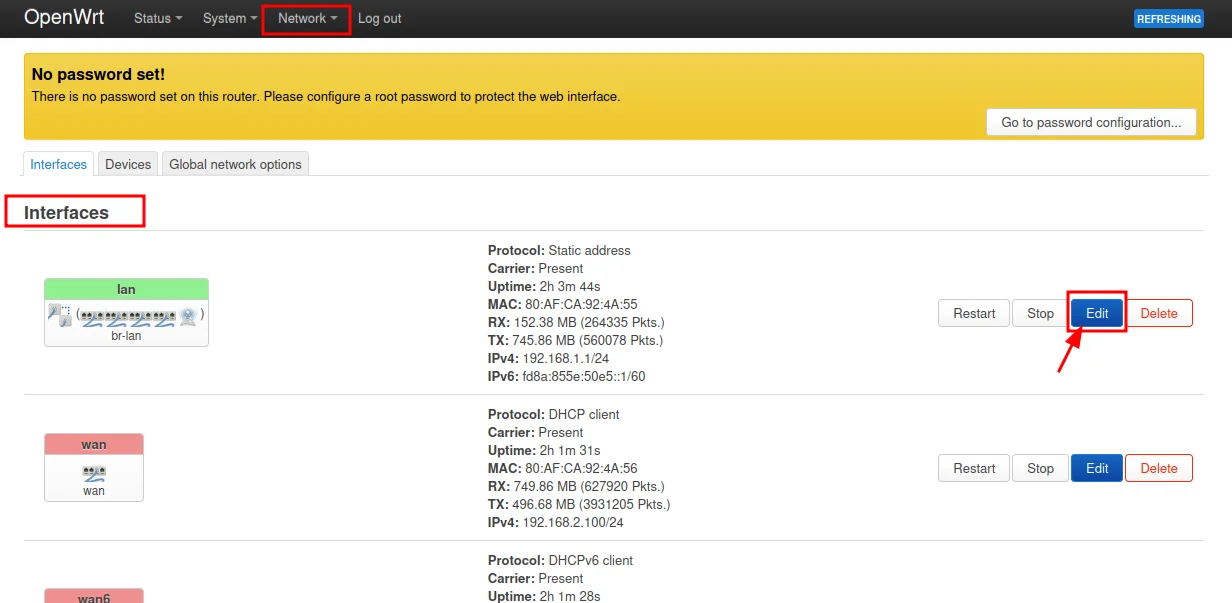
3. Navigate to the LAN interface settings
- In LuCI, go to Network → Interfaces → LAN and click Edit.
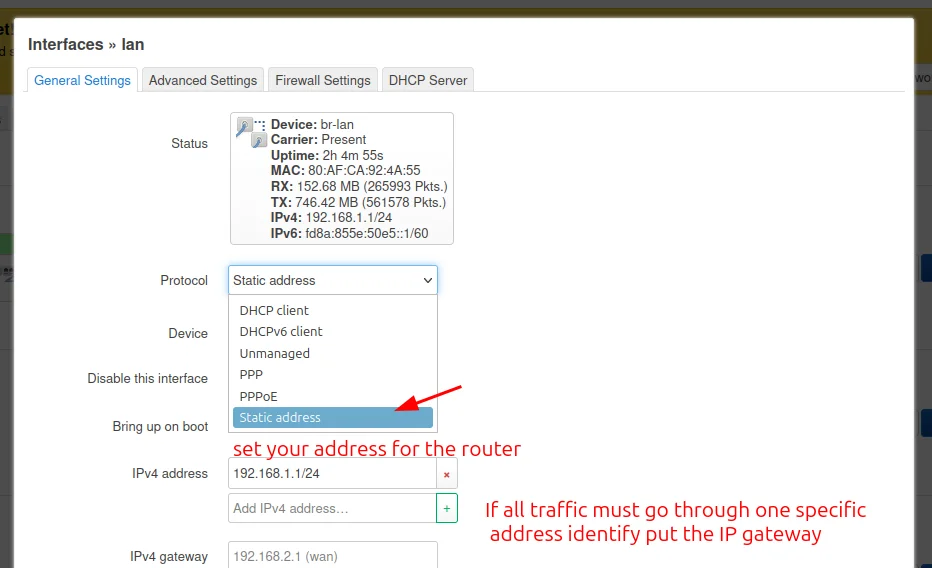
4. Configure the static IP address
- In the IPv4 address field, enter the new IP for this router (e.g.,
192.168.70.1). - Set the IPv4 netmask to
255.255.255.0(for a/24network). - If this router needs to route traffic through another device (e.g., a main gateway router), enter that device's IP in the IPv4 gateway field.
- Click Save & Apply.
Warning
After applying, the router will restart its network services. You'll be disconnected. Unplug and replug your Ethernet cable to get a new IP address in the new range, then reconnect to the router at its new IP.
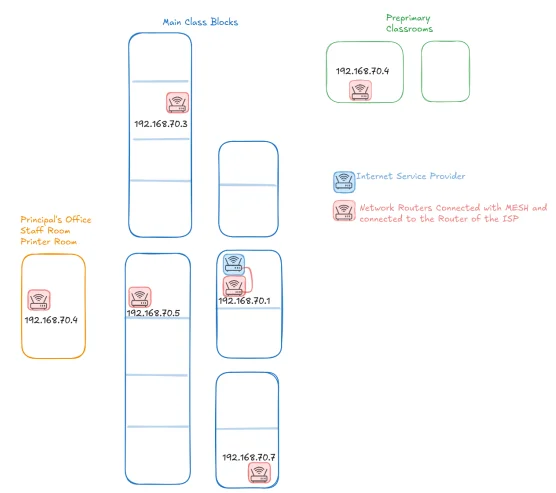
5. Repeat for additional routers
- Connect to each additional router.
- Assign it a unique IP within your chosen range (e.g.,
192.168.70.2,192.168.70.3, etc.). - Set the gateway to point to your main internet-connected router if needed.
6. Document your IP addressing plan
Create a simple document or spreadsheet that tracks:
- Device name — what the device is (e.g., "Office Router", "Classroom AP")
- IP address — the assigned static IP
- Location — where the device is physically located
- MAC address (optional) — useful for DHCP reservations
Keep it updated
An outdated IP plan is worse than no plan. Update it every time you add, move, or remove a device.
Summary
| Setting | Example Value |
|---|---|
| Network range | 192.168.70.0/24 |
| Main router IP | 192.168.70.1 |
| Second router IP | 192.168.70.2 |
| Netmask | 255.255.255.0 |
| Gateway (for secondary routers) | 192.168.70.1 |
References
- OpenWrt Documentation — Network Basics — https://openwrt.org/docs/guide-user/base-system/basic-networking
- OpenWrt Documentation — Static IP Configuration — https://openwrt.org/docs/guide-user/network/ipv4.configuration
Revision History
| Date | Version | Changes | Author | Contributors |
|---|---|---|---|---|
| 2026-04-03 | 1.0 | Initial guide creation | Maria Jover |