OpenWrt 802.11s Wireless Mesh Setup (Iteration 1 — Static IP)
This guide walks you through the first iteration of a wireless mesh deployment: configuring an 802.11s wireless mesh backhaul between two OpenWrt routers using the LuCI web interface, plus a shared 2.4 GHz access point for end users. Each satellite is assigned a unique static LAN IP by hand.
This guide implements the concepts introduced in Chapter 2.2 — Expanding Coverage, in particular Wired vs Wireless.
Next iteration: DHCP-based mesh
Once this static-IP mesh is up and running, the recommended next step is to follow the DHCP-based Mesh guide to centralize IP management on the main router. The two guides are designed to be done in sequence — see the Wireless Mesh overview for the full path.
Other mesh setups possible
This is not the only way to set up a wireless mesh with OpenWrt. This guide focuses on a simple, beginner-friendly setup using LuCI that is suitable for most community network use cases. It uses the 5 GHz band for the mesh backhaul and 2.4 GHz for the access point, but other configurations are possible depending on your hardware capabilities and coverage needs.
What You'll Learn
- How to swap the default Wi-Fi package for one that supports 802.11s mesh
- How to turn a secondary router into a "dumb AP" so it does not conflict with the main router
- How to create a 5 GHz mesh backhaul link between two routers
- How to configure a shared 2.4 GHz access point for seamless roaming
Prerequisites
- Two OpenWrt routers with dual-band radios (2.4 GHz + 5 GHz). Could be also done only with 2.4 GHz.
- Both routers already flashed with OpenWrt (see Flash OpenWrt)
- LuCI web interface accessible on both routers
- Both routers on the same LAN subnet (or reachable for initial configuration)
- A computer with a web browser and an Ethernet cable
Perform the package swap on both routers
Every step marked "on both routers" must use identical settings on each device. A mismatch in mesh ID, channel, or encryption key will prevent the link from forming.
Used Versions
| Software | Version |
|---|---|
| OpenWrt | 25.12.1 |
| wpad-mesh-wolfssl | 2025.08.26~ca266cc2-r1 |
| Router model | Cudy WR3000E v1 |
Your versions may work as well
This guide was tested with the above versions, but other recent versions of OpenWrt and the wpad-mesh package should work similarly.
You can open an issue if you encounter any problems with your versions.
Step-by-Step Implementation
1. Set the LAN IP address
Each router needs a unique IP on your subnet so they do not conflict.
- Go to Network → Interfaces and click Edit on the LAN interface.
-
Change the IPv4 address to fit your main subnet. For example, if the main router is
192.168.70.1, set the secondary router to192.168.70.3.
-
Click Save & Apply. You will need to reconnect to the router using the new IP address.
- On the secondary router only, set the IPv4 gateway to the main router's IP (e.g.,
192.168.70.1) in the same LAN interface edit screen. - On the secondary router only, switch to the Advanced Settings tab and add the main router's IP (e.g.,
192.168.70.1) as a custom DNS server. - Click Apply Unchecked --> Red option. If you only click "Save & Apply" most probably the router will rollback the changes you've made. Reconnect to the router using the new IP address.
Why configure gateway and DNS on the secondary router?
The secondary router itself needs internet access for management tasks like package updates and NTP sync. Pointing its gateway and DNS to the main router gives it that connectivity.
2. Remove the default Wi-Fi package
OpenWrt ships with wpad-basic-mbedtls (or a similar variant), which does not support 802.11s mesh. You must replace it with the mesh-capable version.
- Navigate to System → Software.
- Click Update lists to refresh the package index.
- Filter for
wpad-basic. -
Find your installed version (e.g.,
wpad-basic-mbedtls) and click Remove.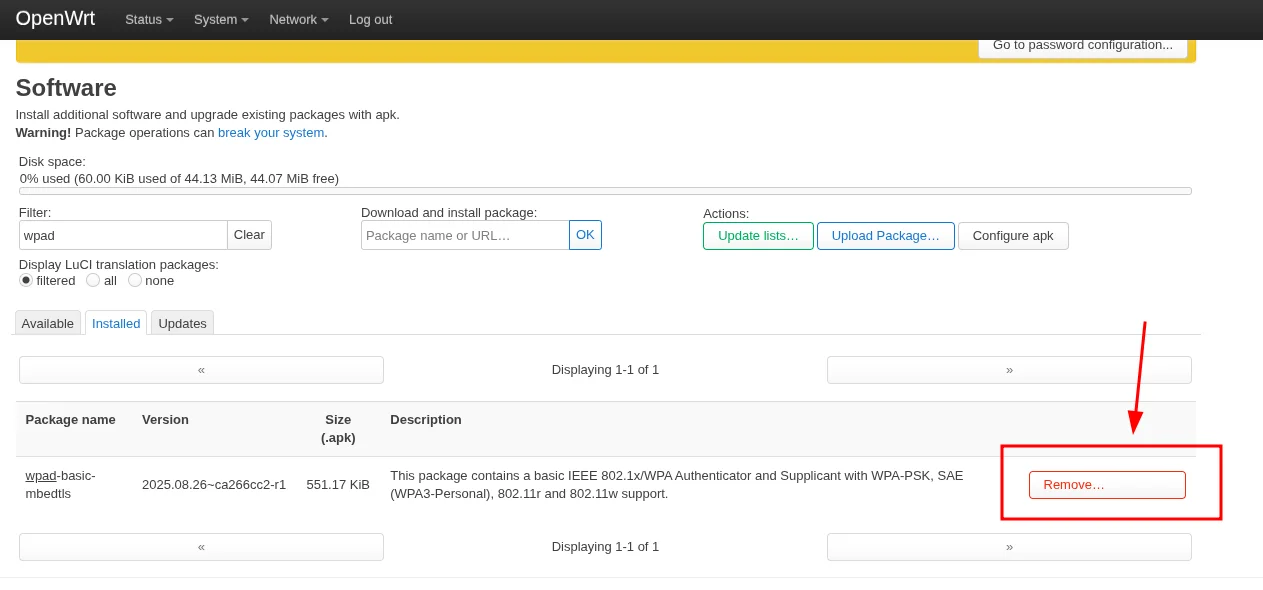
Wait for the removal to finish
Do not proceed until the removal completes. Installing the new package while the old one is still present can cause LuCI errors or a broken Wi-Fi stack.
3. Install the mesh-capable Wi-Fi package
- Still in System → Software, filter for
wpad-mesh. -
Find the matching variant (e.g.,
wpad-mesh-wolfssl) and click Install.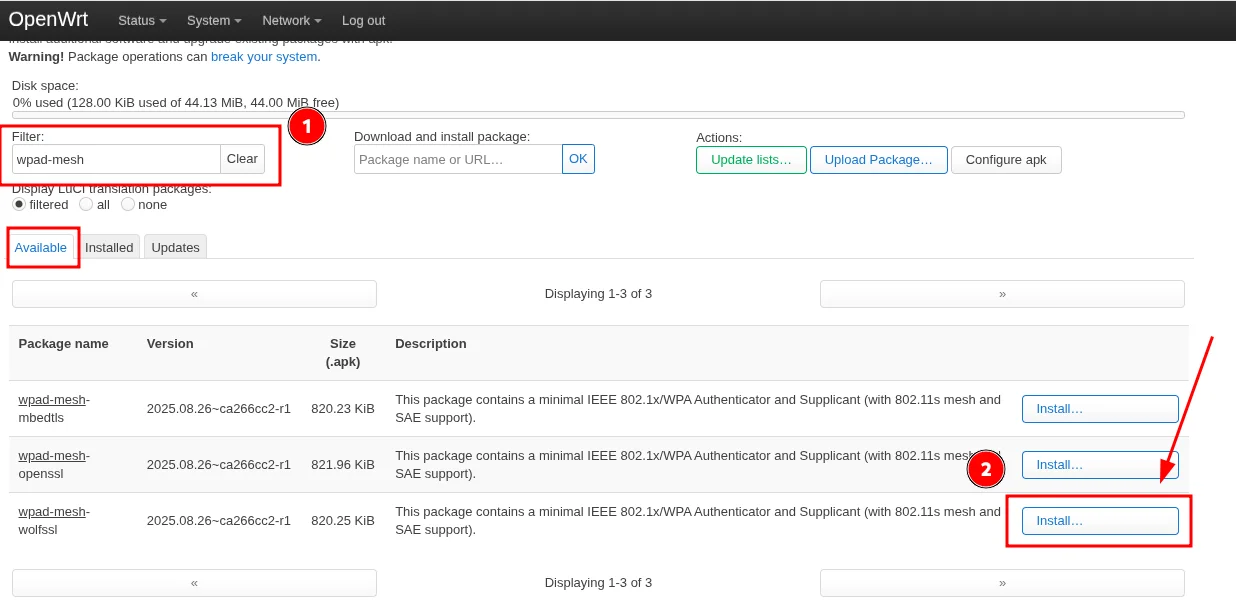
-
Navigate to System → Reboot and restart the router.
- Repeat steps 1 through 3 on the second router before continuing.
Verify the package is active
After rebooting, go back to System → Software and confirm that wpad-mesh-wolfssl (or your chosen variant) appears in the installed list and that wpad-basic-* is gone.
4. Disable DHCP on the secondary router
The secondary router must act as a "dumb AP" so it does not hand out its own IP addresses or compete with the main router's DHCP server.
- On the secondary router only, go to Network → Interfaces and click Edit on the LAN interface.
- Scroll down to the DHCP Server section.
-
Check the box Ignore interface to disable DHCP on this device.
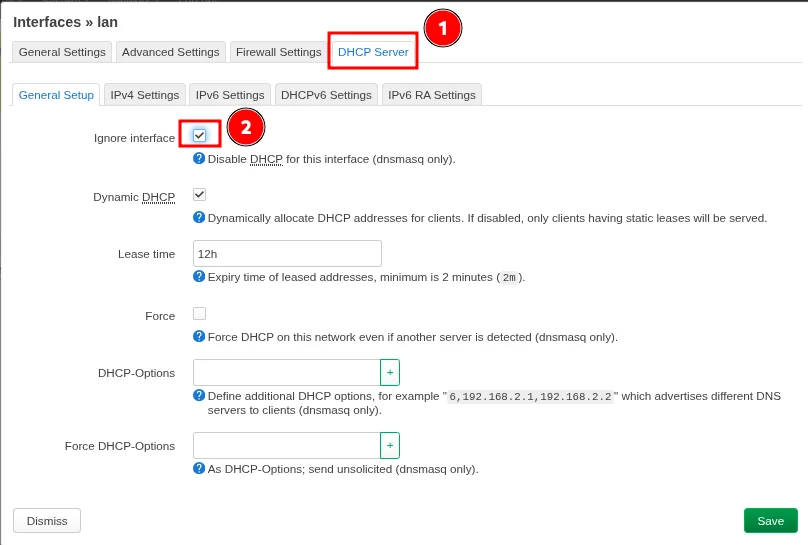
-
Click Save & Apply.
Why disable DHCP?
Two DHCP servers on the same network will hand out conflicting leases, causing intermittent connectivity for all clients. Only the main router should run DHCP.
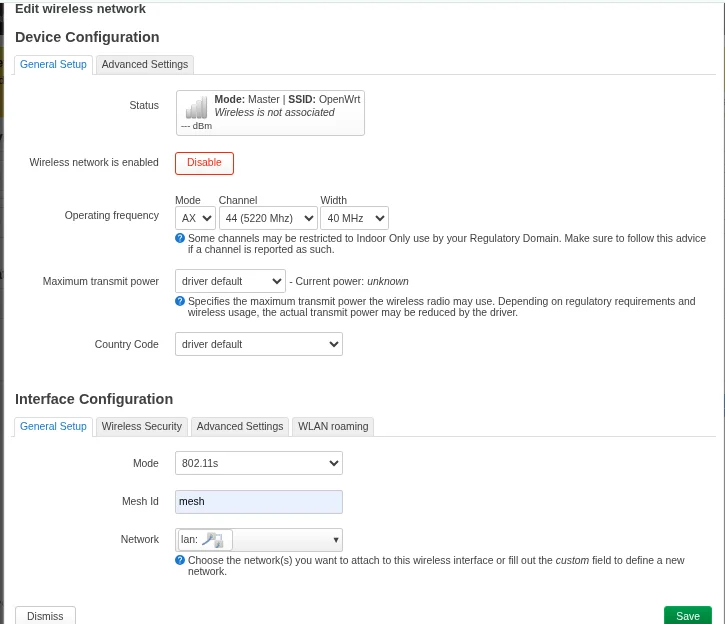
5. Configure the 5 GHz mesh backhaul
This is the wireless link that connects the two routers together. The settings must be identical on both devices.
- On each router, go to Network → Wireless.
-
Find the radios (e.g.
radio0,radio1) and remove any default Wi-Fi networks attached to them.
-
Click Add on the 5 GHz radio to create a new wireless interface.

-
Configure the Device Configuration section:
- Channel: A fixed channel (e.g., 44). Do not use Auto.
- Width: 20 MHz or 40 MHz. Narrower channels penetrate walls better.
-
Configure the Interface Configuration section:
- Mode: 802.11s
- Mesh ID:
School_Backhaul(must match exactly on both routers) - Network: check the box for lan
-
Configure the Wireless Security section:
- Encryption: WPA3-SAE
- Key: a strong password, identical on both routers
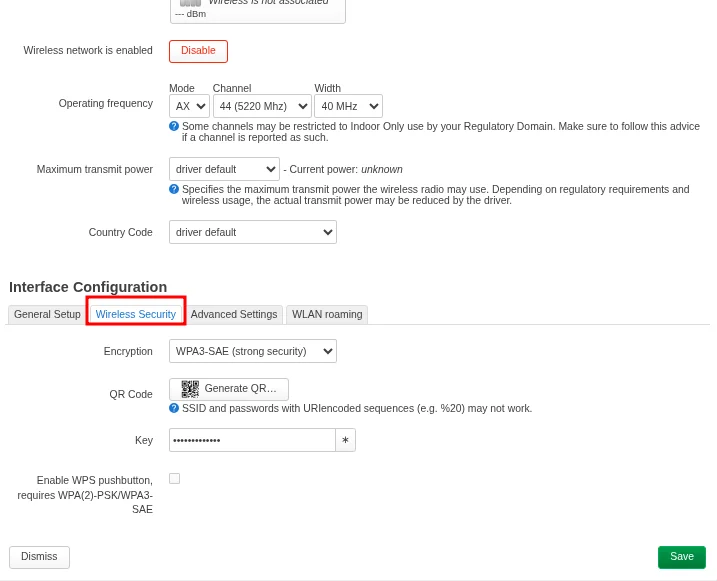
-
Click Save & Apply on both routers.
-
Check the Network → Wireless page — a Tx/Rx rate appearing on the mesh interface and an entry under Associated Stations confirm the link is up.
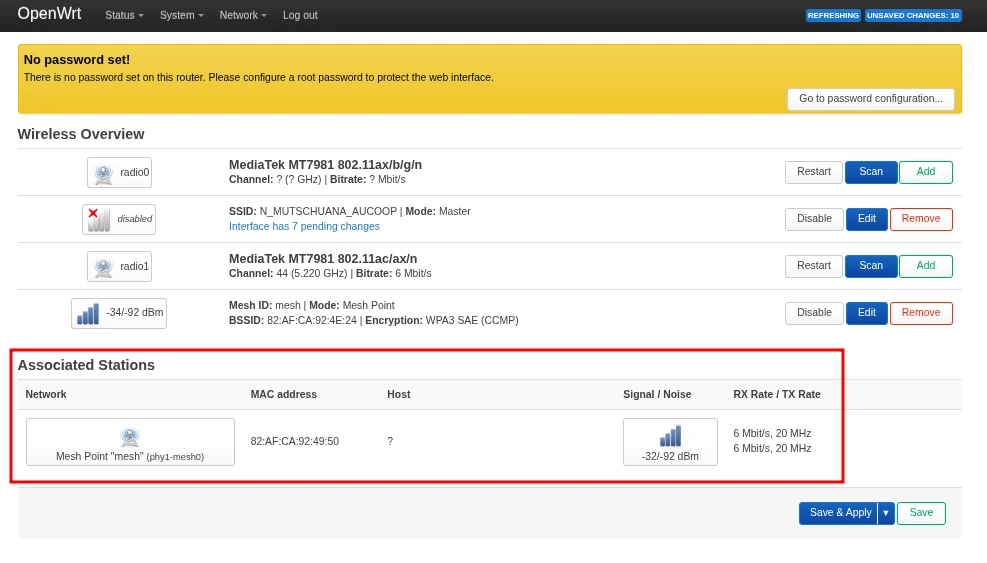
No link forming?
Double-check that the channel, mesh ID, encryption type, and key are identical on both routers. Also ensure both devices are within radio range and that no DFS channels are causing radar detection delays.
6. Configure the 2.4 GHz access point (fronthaul)
This is the Wi-Fi network that end users will connect to. Configure it on both routers so users can roam seamlessly between them.
- Go to Network → Wireless.
- Find the 2.4 GHz radio and click Add (or Edit if a default network exists).
-
Configure the Device Configuration section:
- Channel: Auto, or a fixed non-overlapping channel (1, 6, or 11)
- Transmit Power: Default or Medium (approximately 15–18 dBm)
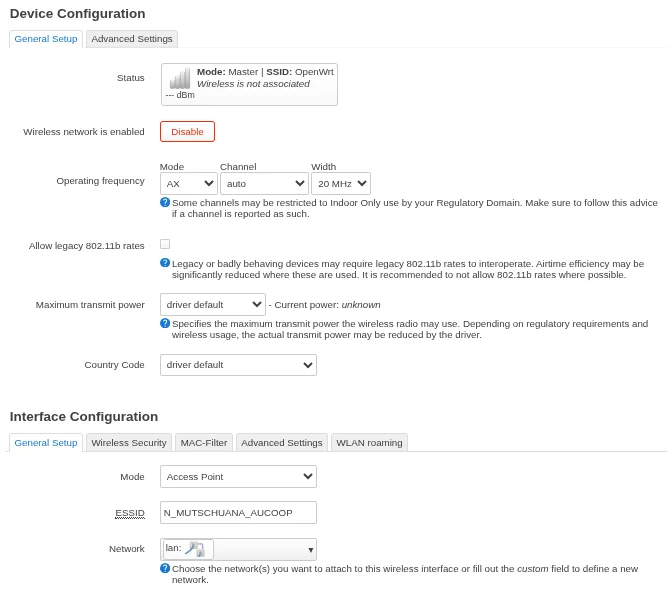
-
Configure the Interface Configuration section:
- Mode: Access Point
- ESSID:
School_Student_WiFi - Network: check the box for lan
-
Configure the Wireless Security section:
- Encryption: WPA2-PSK (best compatibility with older student devices)
- Key: the shared password for students
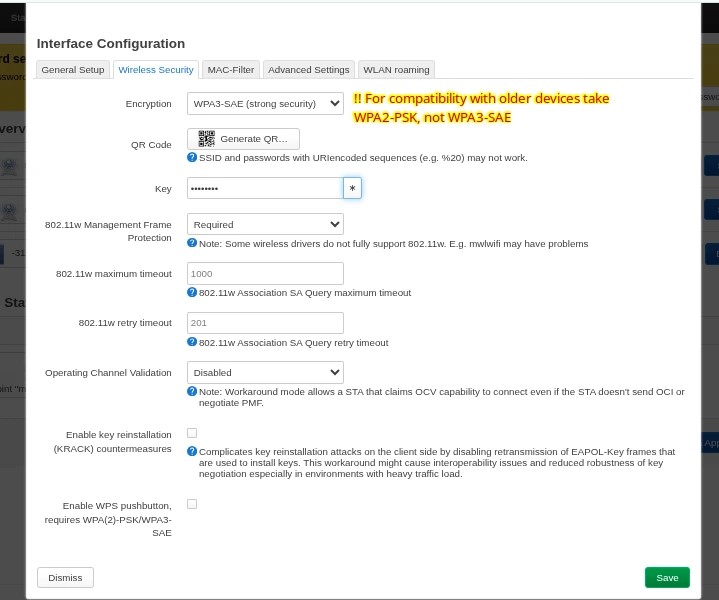
-
Click Save & Apply.
Seamless roaming between access points
For users to move between coverage areas without re-entering the password, the ESSID, Encryption, and Key must be identical on the 2.4 GHz AP of all routers. Devices will automatically switch to the strongest available signal.
References
- OpenWrt Documentation -- Mesh / 802.11s: https://openwrt.org/docs/guide-user/network/wifi/mesh/80211s
- Video: "OpenWrt 802.11s Mesh Setup" — https://www.youtube.com/watch?v=vVoZppb_FR0
Revision History
| Date | Version | Changes | Author | Contributors |
|---|---|---|---|---|
| 2026-03-24 | 1.0 | Initial guide creation | Maria Jover | Jaime Motjé, Sergio Giménez |