Install and Configure Proxmox Backup Server
This guide covers installing Proxmox Backup Server (PBS), creating a datastore, connecting it to your Proxmox VE cluster, and scheduling automated backups.
This guide implements the concept introduced in Chapter 2 — Backups.
What You'll Learn
- How to install PBS (dedicated hardware or as an LXC container)
- How to configure repositories and create a datastore
- How to create backup users and API tokens
- How to connect Proxmox VE to PBS
- How to schedule backup jobs and configure retention policies
- How to restore a VM or container from a backup
Prerequisites
- A machine, VM, or LXC container to run PBS (separate from your Proxmox VE nodes) that meets the system requirements
- A dedicated disk or partition for backup storage (separate from the OS disk)
- Network connectivity between PBS and your Proxmox VE nodes
- Root access to both PBS and Proxmox VE
Used Versions
| Software | Version |
|---|---|
| Proxmox Backup Server | 4.0.18 |
| Proxmox VE | 9.1.2 |
Step-by-Step Implementation
1. Install PBS
Already have a PBS instance?
If your network already has a Proxmox Backup Server running, skip this step. Ask your administrator for the PBS IP address, datastore name, and an API token with DatastoreBackup permissions, then continue from Step 6.
PBS can run on dedicated hardware or as a virtualized instance. Choose the approach that fits your resources:
- Dedicated hardware (recommended for production): Install PBS from the official ISO on a separate physical machine. This gives the best isolation — a Proxmox VE node failure won't take your backups down with it.
- LXC container (good for small deployments): Run PBS inside a container on a Proxmox node. Simpler to set up, but your backups live on the same infrastructure they protect. Make sure the backup disk is physically separate.
System requirements
See official system requirements on system requirements
- CPU: 4+ cores (more cores help with compression and checksumming during parallel backups)
- RAM: 4 GiB minimum for the OS and PBS daemons, plus roughly 1 GiB per TiB of backup storage
- OS disk: 32 GiB minimum, SSD preferred
- Backup disk: as large as your retention policy demands — a good starting point is 2–3x the total size of all VMs and containers you plan to back up
Option A — Dedicated hardware (ISO install)
- Download the latest Proxmox Backup Server ISO from the Proxmox downloads page.
- Create a bootable USB drive using Rufus, Etcher, or
dd: - Boot the target machine from the USB drive. Enter the BIOS if needed and set the USB as the first boot device.
- The PBS installer will start. Click Install Proxmox Backup Server.
- Select the target disk for the OS. All data on this disk will be erased.
- Choose a filesystem:
- ext4 — simple, reliable, single-disk setups
- xfs — good for large files and high throughput
- ZFS — choose this if you have multiple disks and want software RAID
- Set your country, timezone, and keyboard layout.
- Set the root password and an email address for notifications.
- Configure the network:
- Use a static IP address (strongly recommended)
- Set the correct hostname, gateway, and DNS server
- Review the summary and click Install.
- After installation completes, remove the USB drive and reboot.
Option B — LXC container
If you prefer not to dedicate a physical machine, you can run PBS inside an LXC container using a community helper script.
- SSH into your Proxmox VE node.
- Run the helper script:
- Follow the prompts to configure the container (CPU, RAM, storage, network).
- The script will create and start the container with PBS pre-installed. Note the container ID (
CTID) shown when it finishes (e.g.,LXC Container 102 was successfully created.). - Enter the new PBS container from the Proxmox VE host:
- The helper script creates the container without a root password. Set one now — this is the password you will use to log into the PBS web interface:
- Still inside the container, run the post-install script to optimize and configure PBS (it disables the enterprise repo, enables the no-subscription repo, and fixes the Debian sources):
Backup disk separation
Even when running PBS as a container, mount a separate physical disk as the datastore. Backing up to the same disk that hosts your VMs provides no protection against disk failure.
2. Access the web interface
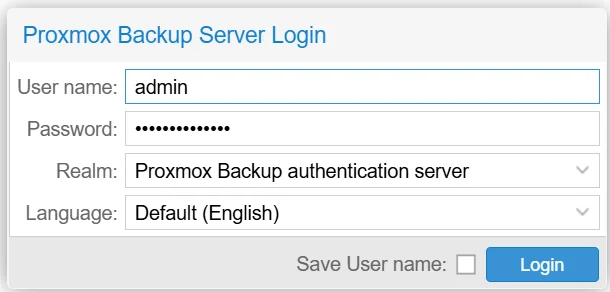
- Open a browser and navigate to:
- Accept the self-signed certificate warning.
- Log in with:
- Username:
root - Password: the root password set during installation (for the LXC install, the one you set with
passwd rootin Step 1) - Realm:
Linux PAM standard authentication
- Username:
3. Configure package repositories
Skip if using the LXC post-install script
If you deployed PBS as an LXC container and ran the post-pbs-install.sh script in the previous step, your repositories are likely already configured. In that case, you can safely skip ahead to Step 4.
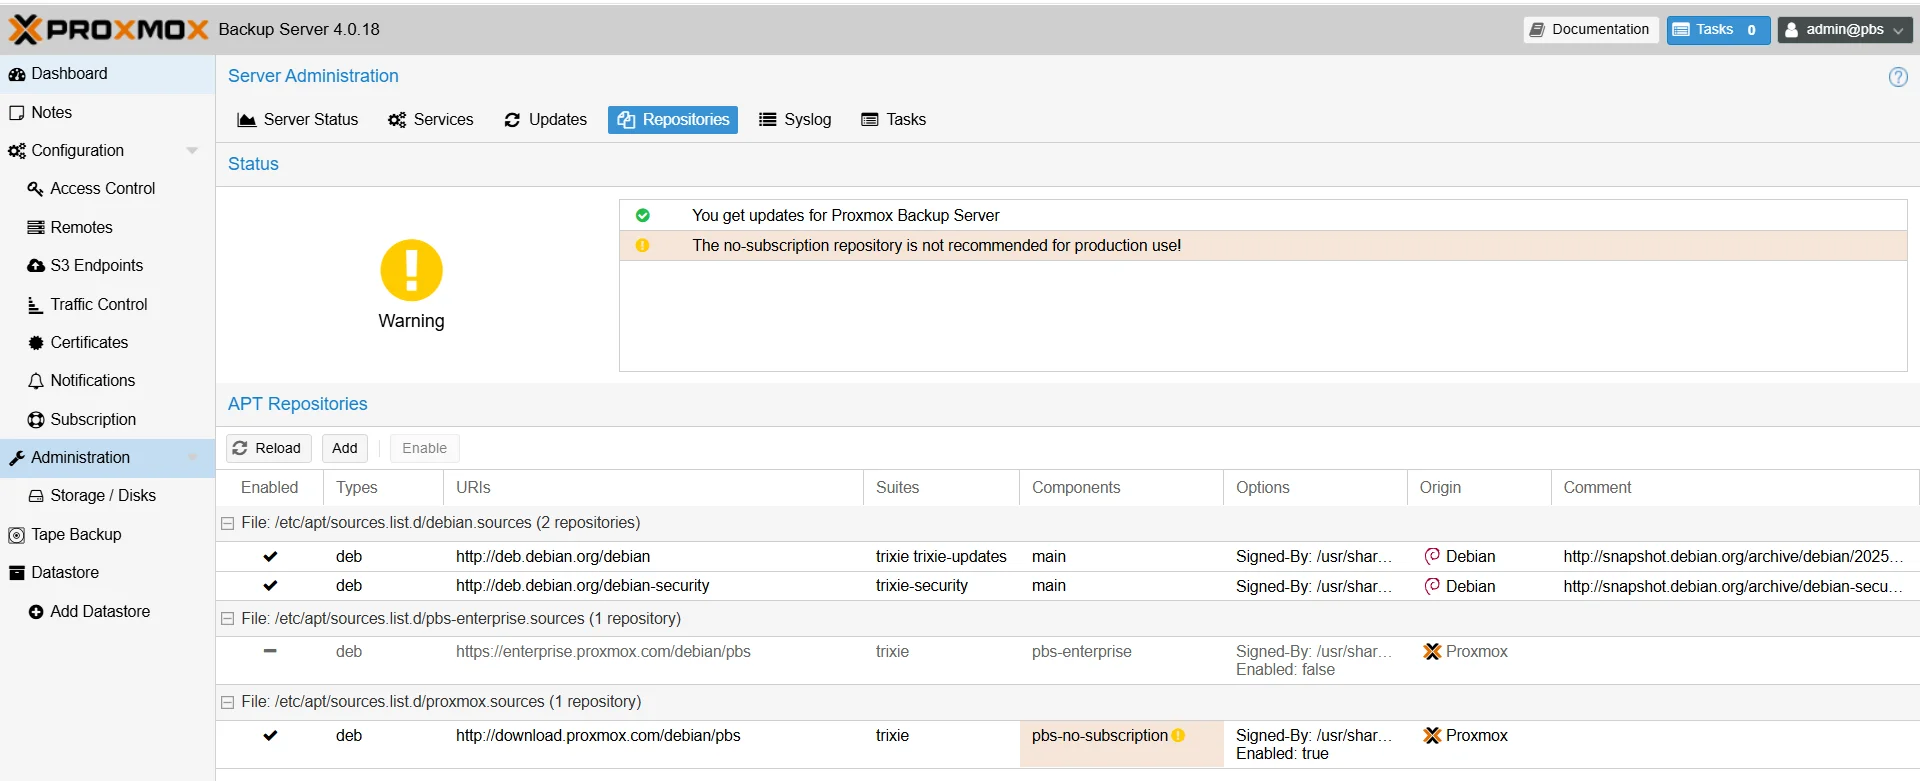
By default, PBS is configured to use the enterprise repository, which requires a paid subscription. For community use, switch to the no-subscription repository.
- In the PBS web UI, navigate to Administration → Repositories.
- Select the enterprise repository and click Disable.
- Click Add and select the No-Subscription repository.
- Click Add to enable it.
-
Update the package index:
Fixing missing GPG keys
If you get a key error such as
Failed to parse keyring "/usr/share/keyrings/proxmox-archive-keyring.gpg"during the update step, explicitly download the Proxmox key first:
4. Create a datastore
A datastore is where PBS stores all backup data. It should point to a dedicated disk or mount point separate from the OS.
- If your backup disk is not yet mounted, format and mount it:
Add it to
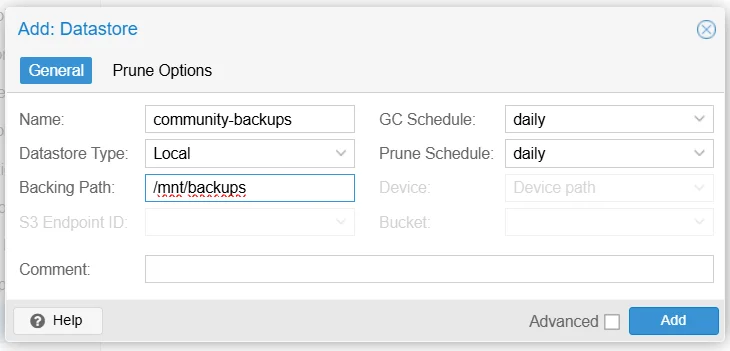
/etc/fstabso it mounts on boot: - In the PBS web UI, navigate to Datastore → Add Datastore.
- Fill in:
- Name: e.g.,
community-backups - Backing Path:
/mnt/backups
- Name: e.g.,
- Click Add.
5. Create a backup user and API token
Avoid using the root account for automated backups. Create a dedicated user and API token.
Create the user:
- Navigate to Configuration → Access Control → User Management.
- Click Add.
- Set:
- User ID:
backup - Password: a strong password
- User ID:
- Click Add.
Assign permissions:
- Navigate to Configuration → Access Control → Permissions.
- Click Add → User Permission.
- Set:
- Path:
/datastore/community-backups(or your datastore name) - User:
backup@pbs - Role:
DatastoreBackup
- Path:
- Click Add.
Create an API token:
- Navigate to Configuration → Access Control → API Token.
- Click Add.
- Set:
- User:
backup@pbs - Token Name: e.g.,
pve-auto
- User:
- Click Add.
- Copy the token secret immediately — it is shown only once.
Assign permissions to the API token:
- Navigate to Configuration → Access Control → Permissions.
- Click Add → API Token Permission.
- Set:
- Path:
/datastore/community-backups(or your datastore name) - API Token:
backup@pbs!pve-auto - Role:
DatastoreBackup
- Path:
- Click Add.
6. Connect Proxmox VE to PBS
On your Proxmox VE node, add the PBS as a storage backend.
- Open the Proxmox VE web UI.
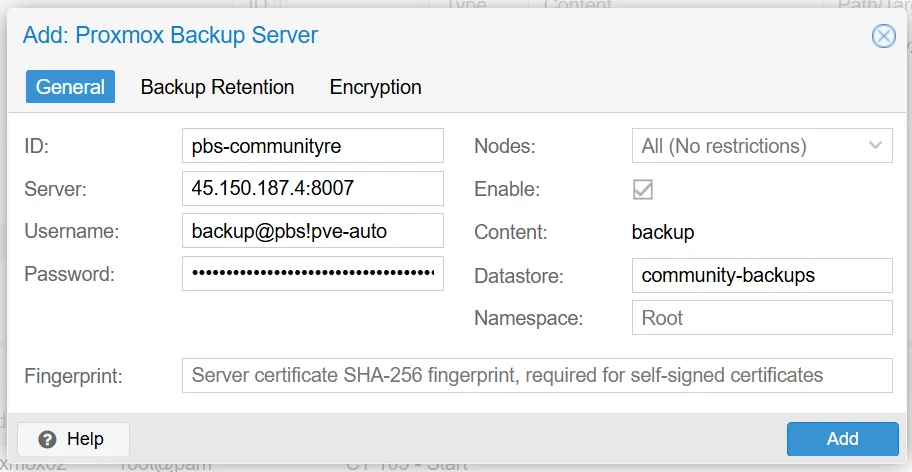
- Navigate to Datacenter → Storage → Add → Proxmox Backup Server.
- Fill in:
- ID: e.g.,
pbs-community - Server: the PBS IP address
- Datastore:
community-backups(must match the datastore name on PBS) - Username:
backup@pbs!pve-auto(user + token ID) - Password: paste the API token secret
- Fingerprint: find this on the PBS web UI by navigating to Datastore → <Your Datastore> → Show Connection Information
- ID: e.g.,
- Click Add.
Error: Cannot find datastore, check permissions and existence
This error from PVE usually has one of these causes:
- Missing API token permission — adding a User Permission for
backup@pbsis not enough. You must also add an API Token Permission forbackup@pbs!pve-autoon the datastore path (see Step 5, sub-steps 14–17). - Datastore name mismatch — the name in the Datastore field must match exactly what is configured on PBS, including case. Verify it in the PBS web UI under Datastore.
7. Schedule backup jobs
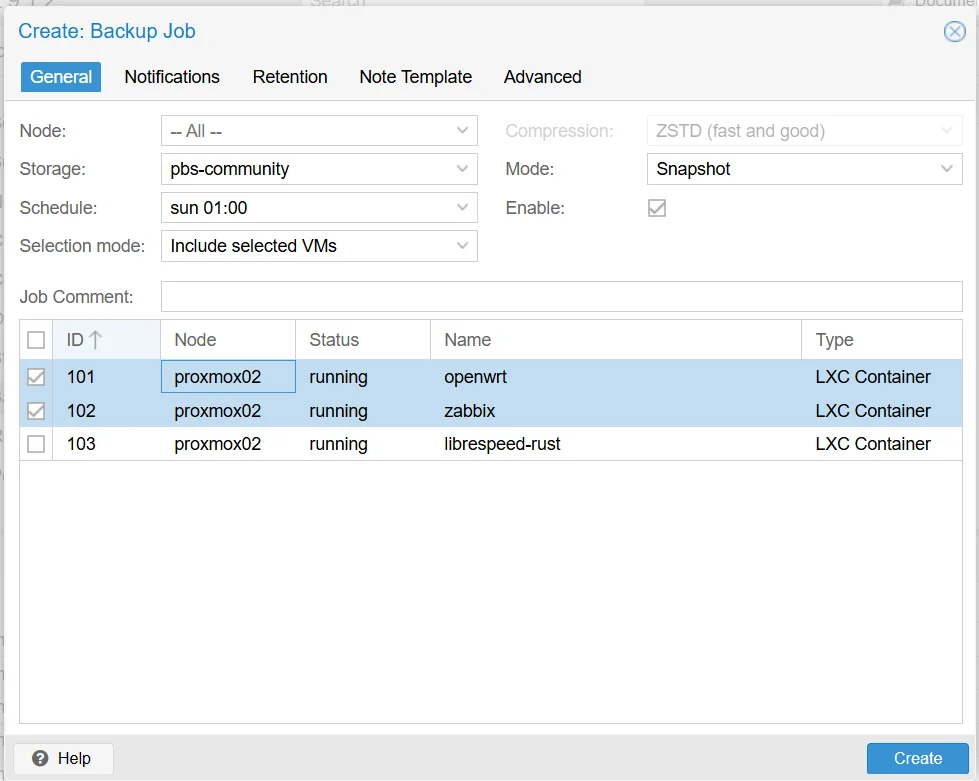
- In the Proxmox VE web UI, navigate to Datacenter → Backup → Add.
- Configure the job:
- Storage: select your PBS storage (e.g.,
pbs-community) - Schedule: e.g., daily at 02:00
- Selection mode: choose All to back up everything, or Include selected VMs to pick specific ones
- Mode:
Snapshot(recommended — backs up VMs without stopping them) - Compression:
ZSTD(good balance of speed and compression ratio)
- Storage: select your PBS storage (e.g.,
- Click Create.
Backup modes
- Snapshot: backs up the VM while it's running (requires QEMU guest agent for consistency)
- Suspend: briefly pauses the VM during backup for a consistent state
- Stop: shuts down the VM, backs it up, then restarts it — most consistent but causes downtime
8. Verify and restore from backups
Always test that you can restore from a backup. A backup you've never tested is a backup you can't trust.
Verify a backup:
- In the Proxmox VE web UI, select a VM or container.
- Go to Backup.
- Select a backup entry and click Show Log to confirm it completed without errors.
Restore a backup:
- Navigate to Datacenter → Storage → <your PBS storage> → Content.
- Select the backup you want to restore.
- Click Restore.
- Choose the target node and storage for the restored VM/container.
- Optionally change the VM ID to avoid conflicts with the original.
- Click Restore and wait for completion.
Restore to a different ID
If the original VM is still running, restore the backup with a different VM ID. This lets you verify the backup without affecting the production service.
9. Configure pruning and garbage collection
Over time, backups accumulate. Pruning removes old backups based on your retention policy. Garbage collection reclaims disk space from deduplicated chunks that are no longer referenced.
Retention policy
You can configure retention on the datastore (applies to all backups) or per backup job in PVE (overrides the datastore policy for that job). The values below are a reasonable starting point — adjust based on your available disk space.
Set up pruning:
- In the PBS web UI, navigate to Datastore → <your datastore> → Prune & GC → Prune Jobs → Add.
- Set the retention policy:
- Keep Last: 3
- Keep Daily: 7
- Keep Weekly: 4
- Keep Monthly: 3
- Set the schedule (e.g., daily).
- Click Save.
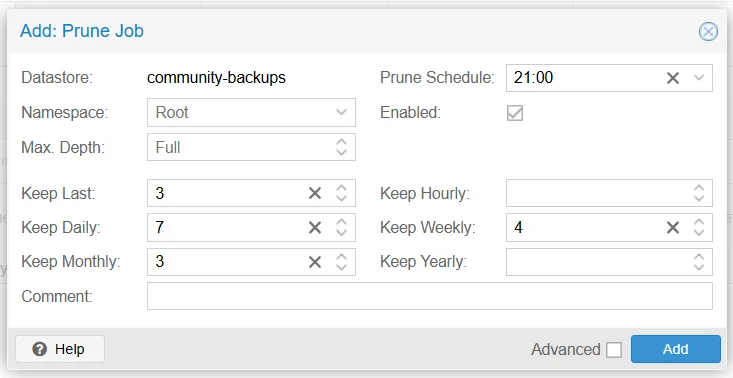
Garbage collection runs automatically after pruning. You can also trigger it manually from the same page.
Monitor disk usage
Deduplication means disk usage doesn't scale linearly with backup count, but it still grows. Check the datastore usage regularly under Datastore → Summary and adjust retention or add storage before running out of space.
References
- Official Documentation: "Proxmox Backup Server Documentation" -- https://pbs.proxmox.com/docs/
- Official Documentation: "System Requirements" -- https://pbs.proxmox.com/docs/system-requirements.html
- Official Download Page: "Downloads" -- https://www.proxmox.com/en/downloads/category/proxmox-backup-server
- Community Script: "Proxmox Backup Server (PBS) Script" -- https://community-scripts.org/scripts/proxmox-backup-server
- Community Script: "PBS Post Install Script" -- https://community-scripts.org/scripts/post-pbs-install
Revision History
| Date | Version | Changes | Author | Contributors |
|---|---|---|---|---|
| 2026-04-02 | 1.0 | Initial guide creation | Jaime Motje | Sergio Giménez |