Run OpenWrt as an LXC Container in Proxmox
This guide covers how to deploy an OpenWrt router inside a lightweight LXC container on Proxmox VE, giving you a fully functional virtual router for your community network infrastructure.
This guide implements the concept introduced in Chapter 2.12 --- Virtualization.
What You'll Learn
- How to create an isolated Linux bridge in Proxmox for internal LAN traffic
- How to download the OpenWrt rootfs image from the Linux Containers image server
- How to create and configure an LXC container running OpenWrt
- How to enable TUN device passthrough for VPN support
- How to access the OpenWrt web interface (LuCI) from your management network
Prerequisites
- Proxmox VE server with web UI access
- Basic familiarity with the Proxmox shell and
pctcommands - Internet access on the Proxmox host
Resource requirements
The OpenWrt LXC container is extremely lightweight: roughly 8 MB of RAM and 21 MB of disk in use. You can safely allocate 64--512 MB of RAM; even 64 MB is enough for basic routing. Increase the allocation if you plan to run many packages or a complex firewall configuration.
Used Versions
| Software | Version |
|---|---|
| Proxmox VE | 9.1.2 |
| OpenWrt | 25.12 (rootfs from Linux Containers) |
Step-by-Step Implementation
1. Create a Linux bridge for the internal LAN
What is a bridge in Proxmox?
A bridge acts as a virtual network switch. You need a dedicated bridge for the OpenWrt container's internal LAN side so that other VMs and containers on the same host can connect to it as clients.
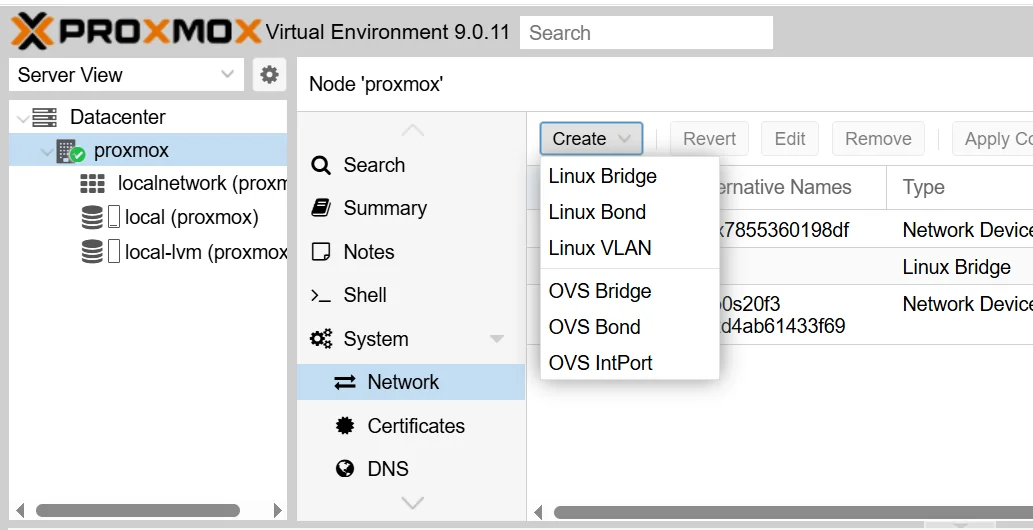
- In the Proxmox web UI, go to Datacenter → your node → System → Network.
- Click Create → Linux Bridge.
- Name:
vmbr1(or any unusedvmbrNname). - Bridge ports: leave blank — this keeps the bridge isolated (internal only). The OpenWrt container will provide DHCP and NAT on this bridge.
- Name:
- Click Create, then Apply Configuration.
Physical NIC attachment
If you want the bridge to carry traffic to a physical LAN segment, add a physical NIC name (e.g., enp2s0) in the Bridge ports field. This guide assumes a purely virtual internal LAN.
2. Download the OpenWrt rootfs
- Open a shell on the Proxmox host (web UI console or SSH).
- Browse https://images.linuxcontainers.org/images/openwrt/ and locate the OpenWrt version you want. Choose the same version running on your physical routers, or pick the latest available.
- Navigate into
amd64/default/for that version. Copy the full URL of therootfs.tar.xzfile. - Download it on the Proxmox host:
wget https://images.linuxcontainers.org/images/openwrt/25.12/amd64/default/<BUILDDATE>/rootfs.tar.xz
Build date in the URL
The URL contains a build date directory (e.g., 20260317_11:57) that changes with each rebuild. Visit the image server in your browser, find the current date string, and copy the direct link.
3. Create the LXC container
Run the following pct create command (replace 101 with any free container ID):
pct create 101 ./rootfs.tar.xz \
  --unprivileged 1 \
  --ostype unmanaged \
  --hostname openwrt \
  --features nesting=1 \
  --net0 name=eth0,bridge=vmbr0 \
  --net1 name=eth1,bridge=vmbr1 \
  --rootfs local-lvm:4 \
  --storage local-lvm
--net0onvmbr0is the WAN / management interface.--net1onvmbr1is the internal LAN interface (the bridge from step 1).- Adjust
--rootfssize and storage name to match your environment.
What the other flags do
| Flag | Purpose |
|---|---|
--unprivileged 1 |
Runs without root-level host privileges. Recommended for third-party rootfs images. |
--ostype unmanaged |
Skips OS-specific setup. Required because OpenWrt is not a standard distribution template. |
--features nesting=1 |
Enables nesting support. Required for dnsmasq to start correctly inside the container. |
The output will end with a warning about architecture detection — this is normal:
Why the warning?
Proxmox cannot identify the OS inside the OpenWrt rootfs, so it falls back to amd64. The container works correctly despite this message.
4. Enable TUN device passthrough
VPN services (WireGuard, OpenVPN) need access to the host's /dev/net/tun device.
-
Open the container config file on the Proxmox host:
-
Add these two lines at the end:
-
Save the file, then start the container:
What these lines do
c 10:200 rwmgrants the container read/write/mknod access to the TUN character device (major 10, minor 200).- The mount entry bind-mounts the host's
/dev/netdirectory into the container so it can see/dev/net/tun.
5. Access the container and enable LuCI
-
Enter the container console:
-
Edit
/etc/config/firewallto allow HTTP on the WAN interface (LuCI only listens on LAN by default): -
Add this rule block at the end of the file:
-
Restart the firewall:
-
Open a browser and go to
http://<openwrt_eth0_ip>. Log in with usernamerootand no password.
Finding the container IP
Run ifconfig inside the container console, or check the Proxmox web UI under the container's Network tab.
Using vi
vi is the only text editor inside the OpenWrt image. Press i to enter insert mode, make your changes, press Esc, then type :wq and Enter to save and quit.
LuCI on the WAN interface
Exposing LuCI on the WAN-facing interface is acceptable only in trusted management networks (such as your Proxmox host's internal bridge). In production, restrict access by IP or use SSH tunneling instead.
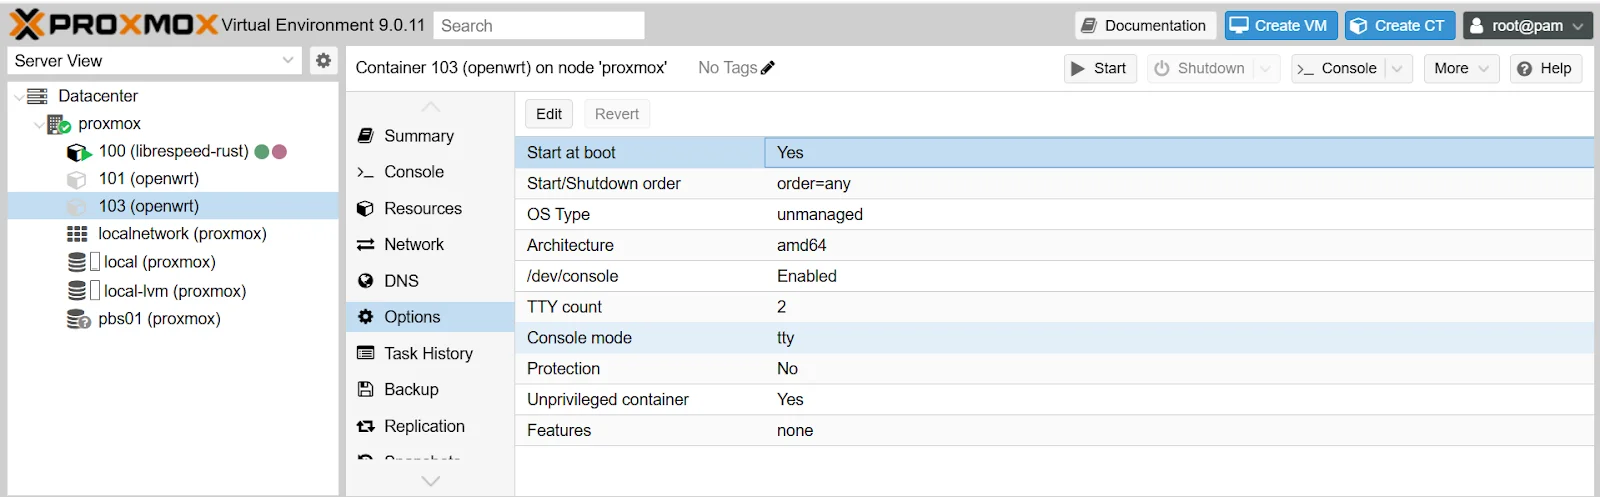
6. Enable start at boot
- In the Proxmox web UI, select the container.
- Go to Options.
- Set Start at boot to Yes.
Troubleshooting
Cannot create TUN interface / VPN fails to start
: Double-check the two lines you added to /etc/pve/lxc/<id>.conf. A small typo (extra slash, wrong device numbers) will prevent the container from seeing /dev/net/tun. Verify the device exists on the host with ls -l /dev/net/tun.
LuCI is unreachable from the browser
: Confirm the firewall rule for port 80 is present in /etc/config/firewall and that you restarted the firewall service. As a fallback, access the container via pct enter <id> from the Proxmox shell.
Permission errors inside the container
: If you see permission-denied errors when accessing devices, confirm that /dev/net/tun exists on the Proxmox host and that the LXC config contains both the cgroup2 allow line and the mount entry. Also verify the container was created with --unprivileged 1.
dnsmasq fails to start
: This typically means the container was created without --features nesting=1. You can add it after creation with pct set 101 --features nesting=1, then restart the container.
References
- YouTube tutorial: "Must-Have OpenWrt Router Setup For Your Proxmox" -- https://www.youtube.com/watch?v=3mPbrunpjpk
Revision History
| Date | Version | Changes | Author | Contributors |
|---|---|---|---|---|
| 2026-03-31 | 1.0 | Initial guide creation | Jaime Motje | Maria Jover, Sergio Gimenez |